2018年12月15日星期六

ESP32 Arduino Tutorial SPIFFS:8. File upload IDE plugin

In this tutorial, we will check how to use an Arduino IDE plugin to upload files to the SPIFFS ESP32 file system.
The plugin we are going to use can be found here. The installation of the plugin is very simple and you can follow the guide detailed here. After following all the installation steps, make sure to confirm that the plugin was correctly installed by going to the tools menu of the Arduino IDE and checking if a new “ESP32 Sketch Data Upload” entry is available there.
This tool will allow us to upload the files directly from a computer’s folder to the ESP32 SPIFFS file system, making it much easier to work with files.
Note that when using the tool to upload files, it will delete any previously existing files in the ESP32 file system.
Important: At the time of writing, as indicated in this GitHub issue, there are some file corruption problems when uploading files with this tool. As suggested in the comments, the easiest way to fix is uploading the Arduino core to the latest version and running the get.exe file to update the SPIFFS tools to the latest version. The get.exe file should be located on the /hardware/espressif/esp32/toolspath, under the Arduino installation folder, accordingly to the Arduino core installation instructions.
The tests were performed using a DFRobot’s ESP32 module integrated in a ESP32 development board.


Uploading files

Uploading files with this tool is really simple, as can be seen in the GitHub page guide. Basically, we need to start by creating a new Arduino sketch and saving it, as shown in figure 1. You can name it however you want.
ESP32 Arduino save sketch.png
Figure 1 – Creating and saving a new Arduino sketch.
After saving it, we need to go to the sketch folder. You can look for it in your computer’s file system or you can simply go to the Sketchmenu and click in “Show Sketch Folder“.
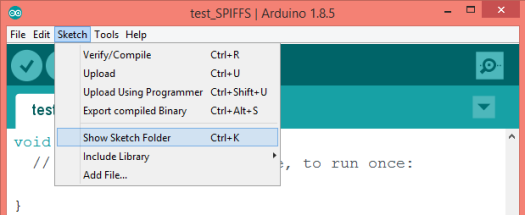
ESP32 Arduino go to sketch folder.png
Figure 2 – Going to the sketch folder.
On the sketch folder, we need to create a folder named data, as indicated in figure 3. It will be there that we will put the files to be uploaded.
ESP32 Arduino sketch folder data.png
Figure 3 – Creating the “data” folder.
Inside the data folder, we will create a file .txt named test_plugin, as shown in figure 4.

ESP32 SPIFFS create txt file to upload with plugin.png
Figure 4 – Creating the file to upload to the SPIFFS file system.
After creating the file we will open it, write some content and save it. You can check below at figure 5 the content I’ve added to mine. You can write other content if you want.
Txt file with some content.png
Figure 5 – Adding some content to the file that will be uploaded.
Finally, we go back to the Arduino IDE and under the Tools menu we simply need to click on the “ESP32 Sketch Data Upload” entry, as shown below at figure 6. Note that the Serial Monitor should be closed when uploading the files.
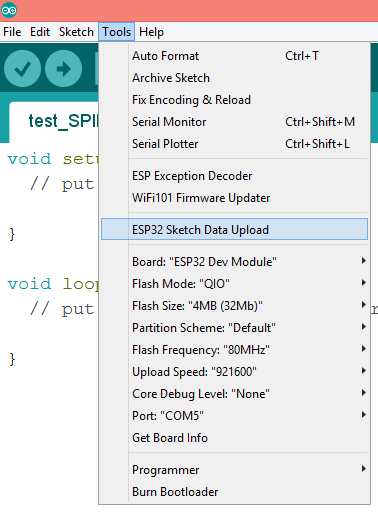
ESP32 SPIFFS Arduino plugin upload file.png
Figure 6 – Uploading the files with the Arduino IDE plugin.
The procedure may take a while depending on the size of the file. It will be signaled at the bottom of the Arduino IDE, in the console, when everything is finished, as shown in figure 7.
ESP32 SPIFFS plugin upload files.png
Figure 7 – Uploading the files.
After the procedure is finished the file should be on the ESP32 file system, as we will confirm below.


Testing code

To confirm that the file was correctly uploaded to the file system, we will create a simple program to open the file and read its content. If you need a detailed tutorial on how to read files from the SPIFFS file system, please check here.
We start our code by including the SPIFFS.h library, so we can access all the file system related functions.
#include "SPIFFS.h"
Moving on to the Arduino setup, we open a serial connection, so we can later output the contents of the file. After that, we will mount the file system, by calling the begin method on the SPIFFS extern variable.
Serial.begin(115200);

if(!SPIFFS.begin(true)){
     Serial.println("An Error has occurred while mounting SPIFFS");
     return;
}
Next, we will open the file for reading. This is done by calling the open method on the SPIFFS extern variable, passing as input the name of the file. Note that the file should have been created in the root directory, with the same name and extension as the one we had on the computer.
So, we should pass the string “/test_plugin.txt” as input of the open method. Note that, by default, the open method will open the file in reading mode, so we don’t need to explicitly specify the mode.
File file = SPIFFS.open("/test_plugin.txt");
Now that we have opened the file for reading, we will check if there was no problem with the procedure and if everything is fine, we will read the content of the file while there are bytes available to read.
if(!file){
    Serial.println("Failed to open file for reading");
    return;
}

Serial.println("File Content:");

while(file.available()){

    Serial.write(file.read());
}
After all the content was retrieved and printed to the serial port, we will close the file with a call to the close method on our File object. The final code can be seen below and already includes this method call.
#include "SPIFFS.h"

void setup() {

   Serial.begin(115200);

   if(!SPIFFS.begin(true)){
        Serial.println("An Error has occurred while mounting SPIFFS");
        return;
   }

    File file = SPIFFS.open("/test_plugin.txt");

    if(!file){
        Serial.println("Failed to open file for reading");
        return;
    }

    Serial.println("File Content:");

    while(file.available()){

        Serial.write(file.read());
    }

    file.close();
}

void loop() {}
After uploading the code to the ESP32 and running it with the Serial monitor opened, you should get an output similar to figure 8, which shows the content of the file that we have written, indicating that the file was successfully uploaded to the SPIFFS file system.
ESP32 SPIFFS file uploaded with Arduino IDE plugin.png
Figure 8 – Output of the program.
DFRobot supply lots of esp32 arduino tutorials and esp32 projects for makers to learn.

2018年12月14日星期五

ESP32 Arduino Tutorial SPIFFS:5. Reading a file

In this tutorial we will check how to read content from a file using the SPIFFS file system of the ESP32, running the Arduino core. For a detailed tutorial on how to write a file, please check the previous tutorial.
In the code below we will write the file before reading it but if you have already followed the previous tutorial, you can skip the writing file part, since the file should have been persisted in the SPIFFS file system.
The tests were performed using a DFRobot’s ESP32 module integrated in a ESP32 development board.


The code

We start the code by including the SPIFFS.h library, so we have access to the methods needed to both write and read from a file. Remember from the previous tutorial that, by including this library, we will have access to the SPIFFS extern variable, which will be the one used to interact with the file system.
#include "SPIFFS.h"
Moving on to the Arduino setup function, we start by initializing a serial connection, so we can later print the content read from the file.
Serial.begin(115200);
Now we will mount the file system by calling the begin method on the SPIFFS extern variable, passing as input the value true, which ensures the file system will be formatted in case mounting fails.
Since the call to the begin method returns true in case the file system mounting is successful and false otherwise, we will also do an error check to know everything was correctly initialized.
if(!SPIFFS.begin(true)){
     Serial.println("An Error has occurred while mounting SPIFFS");
     return;
}
Now we will take care of writing to a file called “/test.txt“, accordingly to what we have covered in the previous tutorial. If you have followed the previous tutorial and already created the file, you can skip this part of the code.
So, we will start by opening the file for writing, calling the open method on the SPIFFS object. As first input we pass the name of the file and as second we pass the constant FILE_WRITE, so the file is opened in writing mode.
This method call will return an object of class File, which we will use to write the content.
In case the file is successfully opened, we will then call the print method on the File object, passing as input the string with the content to write.
We will finally call the close method on the File object, in order to close the file.
File file = SPIFFS.open("/test.txt", FILE_WRITE);

if(!file){
   Serial.println("There was an error opening the file for writing");
   return;
}
    
if(file.print("TEST")){
   Serial.println("File was written");;
} else {
   Serial.println("File write failed");
}

file.close();
Now that we have created the file and written some content, we will open it to read its content.
In order to open the file for read, we call again the open method on the SPIFFS extern variable, passing as input the name of the file (remember it was “/test.txt”). As can be seen in this header file, the default opening mode of a file is reading, so we don’t need to pass the second argument that indicates the opening mode.
Again, this will return an object of class File. Remember from the previous tutorial that the File class overrides the Boolean C++ operator, so we can use an if condition to check if the file was successfully opened.
File file2 = SPIFFS.open("/test.txt");
if(!file2){
    Serial.println("Failed to open file for reading");
    return;
}
We will now read the content from the file in a loop. We will call the available method on the File object to check how many bytes are left to read, and use the returned value as stopping condition of the reading loop.
To read a byte from the file, we call the read method of the File object, and print the result to the serial port.
while(file2.available()){
    Serial.write(file2.read());
}
After reading all the bytes, we close the file by calling the close method on the File object.
file2.close();
The final source code can be seen below.
#include "SPIFFS.h"

void setup() {

   Serial.begin(115200);

   if(!SPIFFS.begin(true)){
        Serial.println("An Error has occurred while mounting SPIFFS");
        return;
   }

    File file = SPIFFS.open("/test.txt", FILE_WRITE);

    if(!file){
        Serial.println("There was an error opening the file for writing");
        return;
    }
    
    if(file.print("TEST")){
        Serial.println("File was written");;
    } else {
        Serial.println("File write failed");
    }

    file.close();

    File file2 = SPIFFS.open("/test.txt");
    
    if(!file2){
        Serial.println("Failed to open file for reading");
        return;
    }

    Serial.println("File Content:");
    
    while(file2.available()){

        Serial.write(file2.read());
    }

    file2.close();
}

void loop() {}


Testing the code

To test the code, compile it and upload it to your ESP32. After the procedure is finished, open the Arduino IDE serial monitor. You should get an output similar to figure 1, which shows the content of the file being printed to the monitor.
ESP32 Arduino SPIFFS file system read file content
Figure 1 – Reading a file from the ESP32 SPIFFS file system.

DFRobot supply lots of esp32 arduino tutorials and esp32 projects for makers to learn

ESP32 Arduino Tutorial SPIFFS:7. Append content to file

In this tutorial we will check how to append content to a file on the ESP32 SPIFFS file system.
We will start by opening a file for writing and write a line of text to it. For a detailed guide on how to open a file for writing, please check here. Then, after closing the file, we will open it again but this time we will append the content, ensuring that we do not overwrite the original text.
Finally, we will read the content of the whole file to confirm the full text is there. For a tutorial on how to read from a file in the ESP32 SPIFFS file system, please check here.
The tests were performed using a DFRobot’s ESP32 module integrated in a ESP32 development board.

The code

As we have been doing in the previous posts, we start with the SPIFFS.h library include, in order to access the SPIFFS extern variable, needed to interact with the file system. This is the only library we will need.
#include "SPIFFS.h"
Then we move on to the Arduino setup, where we will write the rest of the code. We start by opening a serial connection to output the results of the program execution.
Serial.begin(115200);
Then we mound the SPIFFS file system simply by calling the begin method on the SPIFFS external variable. Remember that it becomes available by including the SPIFFS.h library. The “true” Boolean value passed as input of the method will ensure the file system is formatted in case mounting fails.
if(!SPIFFS.begin(true)){
    Serial.println("An Error has occurred while mounting SPIFFS");
    return;
}
After the file system is mounted, our first block of code will take care of writing some content to the file, in writing mode. This will overwrite the file if it already exists.
Like covered in detail in this previous tutorial, in order to write to a file we first need to open it using the open method of the SPIFFSextern variable, passing as first input the name of the file and as second the opening mode.
We will write in a file called “/test.txt” and since we want to open it in write mode, we pass the constant FILE_WRITE as second argument of the open method.
This call will return an object of class File, which we will enclose in an IF clause to check if some error occurred during the opening procedure. This is possible since the File class overrides the C++ Boolean operator.
If the procedure was successful, then we can write to the file simply using the println method on the File object, passing as input the content to write. The println function will add a new line character a the end of the content.
Finally, we close the file with a call to the close method on the File object.
File fileToWrite = SPIFFS.open("/test.txt", FILE_WRITE);

if(!fileToWrite){
    Serial.println("There was an error opening the file for writing");
    return;
}

if(fileToWrite.println("ORIGINAL LINE")){
    Serial.println("File was written");;
} else {
    Serial.println("File write failed");
}

fileToWrite.close();
Now that we have finished the initial writing procedure, we will add an extra line of content to our file. To do it, we will follow the same exact procedure, with the exception in the opening mode.
So, this time, we will open the file in append mode, which will ensure that the written content will be added at the end of the file, without overwriting the previously existing content.
To set the opening method as append, we pass the constant FILE_APPEND to the open method of the SPIFFS variable.
File fileToAppend = SPIFFS.open("/test.txt", FILE_APPEND);
After that we do exactly the same check with an IF condition, to make sure the file was correctly opened, and then we write the new line with the println method call on the File object.
if(!fileToAppend){
    Serial.println("There was an error opening the file for appending");
    return;
}

if(fileToAppend.println("APPENDED LINE")){
    Serial.println("File content was appended");
} else {
    Serial.println("File append failed");
}
After appending the content, we close the file again.
fileToAppend.close();
To finalize, we will read the content of the file to make sure both the original line and the appended one are there.
To do this, we will again open the file, but this time in reading mode, and then print all its content while there are bytes to read. For a detailed explanation on the procedure to read a file from the ESP32 SPIFFS file system, please check this previous post.
File fileToRead = SPIFFS.open("/test.txt");

if(!fileToRead){
    Serial.println("Failed to open file for reading");
    return;
}

Serial.println("File Content:");

while(fileToRead.available()){

   Serial.write(fileToRead.read());
}

fileToRead.close();
The final source code can be seen below.
#include "SPIFFS.h"

void setup() {

   Serial.begin(115200);

   if(!SPIFFS.begin(true)){
        Serial.println("An Error has occurred while mounting SPIFFS");
        return;
   }

    //--------- Write to file
    File fileToWrite = SPIFFS.open("/test.txt", FILE_WRITE);

    if(!fileToWrite){
        Serial.println("There was an error opening the file for writing");
        return;
    }

    if(fileToWrite.println("ORIGINAL LINE")){
        Serial.println("File was written");;
    } else {
        Serial.println("File write failed");
    }

    fileToWrite.close();

    //--------- Apend content to file
    File fileToAppend = SPIFFS.open("/test.txt", FILE_APPEND);

    if(!fileToAppend){
        Serial.println("There was an error opening the file for appending");
        return;
    }

    if(fileToAppend.println("APPENDED LINE")){
        Serial.println("File content was appended");
    } else {
        Serial.println("File append failed");
    }

    fileToAppend.close();

    //---------- Read file
    File fileToRead = SPIFFS.open("/test.txt");

    if(!fileToRead){
        Serial.println("Failed to open file for reading");
        return;
    }

    Serial.println("File Content:");

    while(fileToRead.available()){

        Serial.write(fileToRead.read());
    }

    fileToRead.close();
}

void loop() {}

Testing the code

To test the code, simply use the Arduino IDE to compile it and upload it to your ESP32 device. When the procedure finishes, open the Arduino IDE serial monitor.
As shown in figure 1, you should get the full content of the file, with both the originally written line and the appended one, as expected.
ESP32 SPIFFS file system append to file.png
Figure 1 – Appending content to a file in the ESP32 SPIFFS file system.

DFRobot supply lots of esp32 arduino tutorials and esp32 projects for makers to learn.

2018年12月13日星期四

ESP32 Arduino Tutorial SPIFFS:6. Getting the size of a file

In this tutorial we will check how to obtain the size of the file from the ESP32 SPIFFS file system, using the Arduino core.
For an introduction on how to write to a file, please check here. For a tutorial on how to read from a file, please check this other post.
The tests were performed using a DFRobot’s ESP32 module integrated in a ESP32 development board.


T
he code

As we did in the previous posts, we need to include the SPIFFS.h library. That way, we will have access to the SPIFFS extern variable, which we will use to interact with the file system.
#include "SPIFFS.h"
Moving on to the Arduino setup, we start by opening a serial connection, so we can later output the results of our program. We will also mount the SPIFFS file system, using the begin method of the already mentioned SPIFFS extern variable.
Serial.begin(115200);

if(!SPIFFS.begin(true)){
    Serial.println("An Error has occurred while mounting SPIFFS");
    return;
}
Now we will write some content to a file. Note that if you have already created and written to a file while following one of the previous tutorials, then you can skip this part if you want and use that file.
To open the file, we need to call the open method on the SPIFFS variable, passing as first input the name of the file to open and as second the opening mode. We will write to a file called “test.txt” and open the file in writing mode by passing as second parameter the constant FILE_WRITE.
This will return an object of class File and since this class overrides the C++ Boolean operator, we can check if the opening operation was successful simply by using an IF condition.
File file = SPIFFS.open("/test.txt", FILE_WRITE);

if(!file){
    Serial.println("There was an error opening the file for writing");
    return;
}
If the file was opened with success, we can proceed with writing some content to it. We will declare an arbitrary string and print its size before writing it to the file. Since I’m using a const char * rather than the Arduino String class, it is possible to obtain its size in bytes using the strlen function.
const char * content = "Testing content!";

Serial.print("Content length: ");
Serial.println(strlen(content));
We then proceed with writing the content to the file and doing an error check to confirm that the content was written.
We finish the writing procedure by calling the close method on our file object.
if(file.print(content)){
    Serial.println("File was written");;
} else {
    Serial.println("File write failed");
}

file.close();
Now that we have the file with some content, we will open it in read mode, since we are no longer going to modify it but rather simply read its size.
We do that again by using the open method of the SPIFFS variable but, this time, we don’t need to explicitly pass the opening mode since that is an optional argument that defaults to reading mode (the one we want). This will again return an object of class File.
After that, we check again if the file was open successfully before trying to use it.
File file2 = SPIFFS.open("/test.txt");

if(!file2){
    Serial.println("Failed to open file for reading");
    return;
}
On success, we can obtain the size of the file simply by calling the size method on our File object. This method takes no arguments and returns the size of the file, in bytes.
Serial.print("File size: ");
Serial.println(file2.size());
To finalize the procedure, we close the file.
file2.close();
The final source code can be seen below.
#include "SPIFFS.h"

void setup() {

   Serial.begin(115200);

   if(!SPIFFS.begin(true)){
        Serial.println("An Error has occurred while mounting SPIFFS");
        return;
   }

    File file = SPIFFS.open("/test.txt", FILE_WRITE);

    if(!file){
        Serial.println("There was an error opening the file for writing");
        return;
    }

    const char * content = "Testing content!";

    Serial.print("Content length: ");
    Serial.println(strlen(content));

    if(file.print(content)){
        Serial.println("File was written");;
    } else {
        Serial.println("File write failed");
    }

    file.close();

    File file2 = SPIFFS.open("/test.txt");

    if(!file2){
        Serial.println("Failed to open file for reading");
        return;
    }

    Serial.print("File size: ");

    Serial.println(file2.size());

    file2.close();
}

void loop() {}


Testing the code

To test the previous code, simply compile it and upload it to your device using the Arduino IDE. Upon completion, open the Arduino IDE serial monitor. You should get an output similar to figure 1, which shows both the size of the content written and the size of the file, which match.
ESP32 Arduino SPIFFS file system get size of file.png
Figure 1 – Getting the size of the file in the ESP32 SPIFFS file system.

DFRobot supply lots of esp32 arduino tutorials and esp32 projects for makers to learn.

ESP32 Arduino Tutorial SPIFFS:4. Writing a file

In this tutorial, we will check how to create a file in the ESP32 using the SPIFFS file system.
SPIFFS stands for SPI Flash File System and it is a file system intended for SPI NOR flash devices on embedded devices [1]. You can read more about SPIFFS here.
In this tutorial, we will check how to mount the file system, create a file and write some text to it. We will cover how read from the file in the next tutorials.
This tutorial is based on the Arduino core SPIFFS example, which I encourage you to try.
The tests were performed using a DFRobot’s ESP32 module integrated in a ESP32 development board.

The code

We start our code by including the SPIFFS.h library, so we have access to all the functions we need to interact with the file system.
Note that this include will make available an extern variable called SPIFFS, which we will use below to call some of the methods we need. This extern variable is an object of class SPIFFSFS.
#include "SPIFFS.h"
Now we can move on to the Arduino setup, where we will start by opening a Serial connection. This way, we will be able to output the result of the operations, to know if they were successful or not.
Serial.begin(115200);
After that, we need to mount the file system, so we can start using it. We do it by calling the begin method on the SPIFFS extern variable.
This method receives as optional input a Boolean flag that indicates if the SPIFFS file system should be formatted in case the mount fails. Its value defaults to false, as can be seen by the header file.
Since if SPIFFS was never formatted it will fail mounting and we need to format it, then we will pass this flag as true. In my case, I already had my file system formatted, so this flag has no effect.
The begin method call will return true if the file system is successfully mounted or false otherwise. We will use the returning value of this method to perform an error check before continuing with the code.
if(!SPIFFS.begin(true)){
      Serial.println("An Error has occurred while mounting SPIFFS");
      return;
}
If mounting the file system succeeds, we can proceed with the creation of the file. To do it, we simply need to call the open method of the SPIFFS extern variable. Note that the SPIFFSFS class extends the FS class and this method is inherited from that class.
The mentioned method receives as first input the name of the file and as second the opening mode. We will create a file called “/test.txt” and since we want to open the file for writing, we use the FILE_WRITE constant, which is defined here.
Naturally, the file doesn’t need to exist beforehand for us to open it. In our case, we are creating a new file because it did not exist before.
This method call returns an object of class File, which we will use below to write to the file.
File file = SPIFFS.open("/test.txt", FILE_WRITE);
Note that the File class overloads the C++ Boolean operator, which means we can check if the file was successfully opened with an if condition.
if(!file){
     Serial.println("There was an error opening the file for writing");
     return;
}
In case it was successfully opened, we can simply write some content to the file using the print method on our File object. Note that the File class extends the Stream class, which extends the Print class. The print method we are going to use is inherited from the Printclass.
Since this method returns the number of bytes written, we can do an error check with an IF condition.
if(file.print("TEST")) {
    Serial.println("File was written");
}else {
    Serial.println("File write failed");
}
Finally, we call the close method to close the file.
file.close();
The final source code can be seen below.
#include "SPIFFS.h"

void setup() {

  Serial.begin(115200);

  if (!SPIFFS.begin(true)) {
    Serial.println("An Error has occurred while mounting SPIFFS");
    return;
  }

  File file = SPIFFS.open("/test.txt", FILE_WRITE);

  if (!file) {
    Serial.println("There was an error opening the file for writing");
    return;
  }
  if (file.print("TEST")) {
    Serial.println("File was written");
  } else {
    Serial.println("File write failed");
  }

  file.close();
}

void loop() {}

Testing the code

To test the code, simply compile it and upload it to your device using the Arduino IDE, with an installation of the Arduino core for the ESP32.
Once the procedure finishes, open the Arduino IDE Serial Monitor. You should get an output similar to figure 1, which indicates the content was correctly written to the file.
ESP32 Arduino SPIFFS write file.png
Figure 1 – Writing a file in the ESP32 SPIFFS file system.

DFRobot supply lots of esp32 arduino tutorials and esp32 projects for makers to learn.