2018年12月17日星期一

ESP32 Tutorial Async HTTP web server:11. websockets introduction

In this tutorial we will check how to setup a websocket endpoint on a HTTP web server, using the ESP32 and running the Arduino core.
In order to setup the server, we will use the ESP32 async HTTP web server libraries. For a detailed tutorial on how to install the libraries and how to get started using them, please consult this previous post. Also, in the “Related Posts” section at the end of this post, you can find more tutorials using these libraries.
Besides many other features, the mentioned HTTP web server libraries allow us to setup a websocket endpoint using their asynchronous websocket plugin.
Note that we have already covered some websocket functionalities on previous posts. Nonetheless, in those tutorials, we were using a library that only implements the websockets functionalities.
The advantage of using the HTTP asynchronous web server and its websockets plugin is that we can add the websockets functionality without using another listening service or port [1].
In order words, this means that we can setup a server that is able to handle both websocket clients and also regular HTTP clients.
The websocket plugin exposes a lot of functionalities but, in this introductory tutorial, we will start with something simple. So, in our code, we will define a handling function that will be executed when websocket related events occur, more precisely when a client connects or disconnects.
For the client implementation, we will develop a very simple Python program. It will connect to the websocket endpoint, wait for a message, print it and disconnect.
In order to have access to the websocket related functionality in Python we will need to install a module. The mentioned module is called websocket-client and it can be easily installed with pip (a Python package installer) using the command below:
pip install websocket-client
For this tutorial to work, both the ESP32 and the computer that will run the Python code need to be connected to the same WiFi network.
The present tutorial is based on this example from the HTTP asynchronous webserver libraries, which covers a lot more functionalities. This is a very good example which I encourage you to try.
The tests were performed using a DFRobot’s ESP32 module integrated in a ESP32 development board.


The Arduino code

Includes and global variables

The first thing we need to do is including some libraries. One is the WiFi.h library, which will allow us to connect the ESP32 to a WiFi network.
Additionally, we will need the ESPAsyncWebServer.h library, which will expose all the HTTP webserver and websocket functionality.
#include <WiFi.h>
#include <ESPAsyncWebServer.h>
Since we will connect the ESP32 to a WiFi network, we need to store the credentials of that network, more precisely the network name and the password. We will save them in to global variables at the top of our code, so they are easy to change.
When testing the code, you should replace the placeholders below by the actual credentials of your WiFi network.
const char* ssid = "yourNetworkName";
const char* password = "yourNetworkPassword";
Next, we will need an object of class AsyncWebServer, which is needed to configure the HTTP asynchronous webserver.
Note that the constructor of this class receives as input the number of the port where the server will be listening for incoming HTTP requests. We will use port 80, which is the default HTTP port.
AsyncWebServer server(80);
Additionally, we will need an object of class AsyncWebSocket, which we will use to configure our websocket endpoint and corresponding handler function.
The constructor of this class receives as input the websocket endpoint. We will be listening on the “/ws” endpoint for this test, but you can try with another endpoint if you want, as long as you adapt the Python code accordingly.
AsyncWebSocket ws("/ws");


Setup

Moving on to the Arduino Setup function, we will start by opening a serial connection and connecting the ESP32 to the WiFi network. Remember that we have stored the WiFi network credentials as global variables.
Note that after the connection is established, we are printing the local IP assigned to the ESP32 on the network. The IP outputted here is the one that we need to use in the Python code, when specifying the websocket server address.
Serial.begin(115200);

WiFi.begin(ssid, password);

while (WiFi.status() != WL_CONNECTED) {
 delay(1000);
 Serial.println("Connecting to WiFi..");
}

Serial.println(WiFi.localIP());
Next, we will bind our websocket endpoint to a handler function that will be executed when websocket related events occur.
We do this by calling the onEvent method on our AsyncWebSocket object. As input this method receives a function that needs to respect this signature (defined by the type AwsEventHandler).
Note that the signature contemplates a lot of parameters, but we will only used a few for this tutorial. We will cover the creation of this handling function below.
ws.onEvent(onWsEvent);
Next we need to register our AsyncWebSocket object in the asynchronous HTTP web server. We do this by calling the addHandler method on the AsyncWebServer object, passing as input the address of the AsyncWebSocket object.
server.addHandler(&ws);
Finally, we call the begin method on the AsyncWebServer object, in order for it to start listening to incoming requests.
server.begin();


Websocket handling function

As mentioned before, the websocket events handling function needs to follow a predefined function signature, specified by the AwsEventHandler type. The whole function signature with all the parameters is shown below.
void onWsEvent(AsyncWebSocket * server, AsyncWebSocketClient * client, AwsEventType type, void * arg, uint8_t *data, size_t len){
// handling code
}
For this introductory tutorial, we will only focus on the second and third arguments. The second argument is a pointer to an object of class AsyncWebSocketClient and it is the object we will use to send data back to the client, when it connects to our server.
The third argument corresponds to a variable of type AwsEventType, which is an enum. This enum contains all the websocket events that can trigger the execution of our handling function.
Thus, we use this third argument to check what event has occurred and handle it accordingly.
In our example, we will handle two event types: the connection and the disconnection of the websocket client. We can do this handling with some simple conditional blocks applied to the event type function parameter.
So, in case the event corresponds to the connection of a client, the enumerated value will be WS_EVT_CONNECT.
if(type == WS_EVT_CONNECT){
//websocket client connected
}
When we receive that event, we will simply print a message to the serial port indicating a new client has connected and then send a “hello world” message back to the client.
We can send the message to the client by calling the text method on our client object, passing as input the text to send. Note that since we have access to a pointer to the client object, then we need to use the -> operator in order to access the text method.
if(type == WS_EVT_CONNECT){

    Serial.println("Websocket client connection received");
    client->text("Hello from ESP32 Server");
}
For the client disconnection event, we receive the enumerated value WS_EVT_DISCONNECT, so we will have another condition looking for this. In this case, we will simply print a message to the serial port indicating the disconnection of the client.
} else if(type == WS_EVT_DISCONNECT){
    Serial.println("Client disconnected");
}
The full handling function can be seen below.
void onWsEvent(AsyncWebSocket * server, AsyncWebSocketClient * client, AwsEventType type, void * arg, uint8_t *data, size_t len){

  if(type == WS_EVT_CONNECT){

    Serial.println("Websocket client connection received");
    client->text("Hello from ESP32 Server");

  } else if(type == WS_EVT_DISCONNECT){
    Serial.println("Client disconnected");

  }
}


The final Arduino code

The final Arduino source code can be seen below. Note that since this is a asynchronous solution, we don’t need to periodically call any client handling function in the Arduino main loop.
#include <WiFi.h>
#include <ESPAsyncWebServer.h>

const char* ssid = "yourNetworkName";
const char* password =  "yourNetworkPassword";

AsyncWebServer server(80);
AsyncWebSocket ws("/ws");

void onWsEvent(AsyncWebSocket * server, AsyncWebSocketClient * client, AwsEventType type, void * arg, uint8_t *data, size_t len){

  if(type == WS_EVT_CONNECT){

    Serial.println("Websocket client connection received");
    client->text("Hello from ESP32 Server");

  } else if(type == WS_EVT_DISCONNECT){
    Serial.println("Client disconnected");

  }
}

void setup(){
  Serial.begin(115200);

  WiFi.begin(ssid, password);

  while (WiFi.status() != WL_CONNECTED) {
    delay(1000);
    Serial.println("Connecting to WiFi..");
  }

  Serial.println(WiFi.localIP());

  ws.onEvent(onWsEvent);
  server.addHandler(&ws);

  server.begin();
}

void loop(){}


The Python code

The Python code will be really simple. We start by importing the previously installed websocket module, so we can create the websocket client.
import websocket
Then, we need to create an object of class WebSocket, which is defined in the module we have just imported.
ws = websocket.WebSocket()
Then, we establish the connection to the server by calling the connect method on the WebSocket object.
This method receives as input a string with the websocket endpoint address, in the format below. You should change #ESP_IP# by the IP of your ESP32 (remember that it will be printed in the serial port when the Arduino program connects to the WiFi network) and #websocket_endpoint# by the server endpoint (in the Arduino code we have configured it to be “/ws”):
ws://#ESP_IP#/#websocket_endpoint#
You can check the method call with the endpoint for my ESP32. Note that the local IP assigned to your ESP32 will most likely be different from mine.
ws.connect("ws://192.168.1.78/ws")
Then, to receive data from the server, we simply call the recv method on our WebSocket object. This method will return the data received from the server, in case there is any data available. Otherwise, it will block waiting for the data.
After receiving the data, we will print it, to later check if it matches the message we specified in the ESP32 Arduino program.
result = ws.recv()
print(result)
To finalize, we call the close method on our WebSocket object to disconnect from the server.
ws.close()
The final complete code can be seen below.
import websocket

ws = websocket.WebSocket()
ws.connect("ws://192.168.1.78/ws")

result = ws.recv()
print(result)

ws.close()


Testing the code

To test the whole system, start by uploading the Arduino code to your ESP32 using the Arduino IDE. Once the procedure finishes, open the Arduino IDE serial monitor.
After the ESP32 successfully connects to the WiFi network, it should print the local IP assigned to it. That is the IP that you should use on the Python code, when specifying the websocket server address.
After this, simply run the Python code. As indicated in figure 1, it should output the message we have specified in the Arduino code. Note that the Python client immediately disconnects after receiving the message.
ESP32 Async HTTP web server web socket From Python client.png
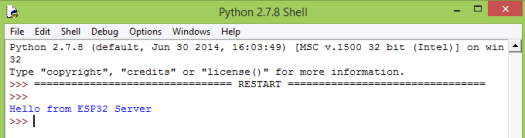
Figure 1 – Output of the Python program.
If you go back to the Arduino IDE serial monitor, you should get the an output similar to figure 2, which shows that both the client connection and disconnection events were detected.
ESP32 async webserver websocket detect python client connect disconnect events.png
Figure 2 – Websocket client connection and disconnection events detected on the ESP32.
DFRobot supply lots of esp32 arduino tutorials and esp32 projects for makers to learn.

2018年12月16日星期日

ESP32 Tutorial HTTP webserver:12. receiving textual data in websocket

In this tutorial we will check how to receive textual data from a client on a websocket, using the ESP32 and the Arduino core.
We will be using the Async HTTP web server libraries to host the websocket endpoint that will be contacted by the client. For an introduction on the async websockets plugin from these libraries, please check the previous post.
We will be implementing the websocket client in Python. All the code needed is also shown below and, as we will see, it will be very simple and short.
The tests from this tutorial were performed using a DFRobot’s ESP32 module integrated in a ESP32 development board.


The Arduino code

Includes and global variables

As usual, we start by including the libraries needed. We will include both the WiFi.h, for connecting the ESP32 to a Wifi network, and the ESPAsyncWebServer.h, in order to setup the server.
Additionally, we will store the network credentials in two constant global variables. We will need both the network name and password.
We will also need an object of class AsyncWebServer, so we can setup the whole HTTP server. As input, the constructor of this class will receive the port where the server will be listening to requests.
Finally, as global variable, we will need an object of class AsyncWebSocket. This object will be used to setup the websocket endpoint and the corresponding handling function, which will execute whenever a websocket event occurs.
Note that, as input of the constructor, we need to pass the websocket endpoint. We will setup the “/test” endpoint.
#include "WiFi.h"
#include "ESPAsyncWebServer.h"

const char* ssid = "yourNetworkName";
const char* password =  "yourNetworkPassword";

AsyncWebServer server(80);
AsyncWebSocket ws("/test");


The setup

Moving on to the Arduino setup, the first thing we will do is opening a serial connection, so we can output some messages from our program. After that, we will connect the ESP32 to the WiFi network.
Note that, once the connection is established, we print the local IP assigned to the ESP32 on the WiFi network. This IP will be needed in the Python code, when specifying the server address.
Serial.begin(115200);

WiFi.begin(ssid, password);

while (WiFi.status() != WL_CONNECTED) {
    delay(1000);
    Serial.println("Connecting to WiFi..");
}

Serial.println(WiFi.localIP());
The rest of the setup function will be very simple and consist on the web server configurations.
First, we need to bind a handling function to our websocket endpoint, in order for our code to run when a websocket event occurs. We do this by calling the onEvent method on our AsyncWebSocket object.
As input, this method receives the handling function to execute when such event occurs. This function needs to have the signature defined by the AwsEventHandler type, which can be seen here. We will specify the function later.
ws.onEvent(onWsEvent);
Now, we need to register the websocket object on the HTTP web server. This is done by calling the addHandler method of the AsyncWebServer object, passing as input the address of the AsyncWebSocket object.
server.addHandler(&ws);
Finally, in order for the web server to start listening to incoming requests, we need to call the begin method AsyncWebServer object.
server.begin();
The whole setup function can be seen below.
void setup(){
  Serial.begin(115200);

  WiFi.begin(ssid, password);

  while (WiFi.status() != WL_CONNECTED) {
    delay(1000);
    Serial.println("Connecting to WiFi..");
  }

  Serial.println(WiFi.localIP());

  ws.onEvent(onWsEvent);
  server.addHandler(&ws);

  server.begin();
}


The handling function

To finalize the code, we need to define the web socket endpoint handling function which, as already mentioned, needs to have a signature like the one defined by the AwsEventHandler type.
void onWsEvent(AsyncWebSocket * server, AsyncWebSocketClient * client, AwsEventType type, void * arg, uint8_t *data, size_t len){
// WS event handling code
}
In the previous post, we focused our attention in the second and third arguments. As seen there, the third argument corresponds to an enum that indicates the type of websocket event that occurred.
The two events covered in that post where the client connection and disconnection, which we will also use here for debugging purposes.
Additionally, we will also look for the enumerated value WS_EVT_DATA, which indicates that data was received from the client.
if(type == WS_EVT_CONNECT){
 Serial.println("Websocket client connection received");

} else if(type == WS_EVT_DISCONNECT){
  Serial.println("Client disconnected");

} else if(type == WS_EVT_DATA){
  // Data received handling
}
In order to check the received data, we will look to the fifth and sixth arguments of our function, more precisely the array of data bytes and the length of the data received, respectively.
Just as a note, for simplicity, we are assuming that all the data is sent in a single frame. If you need to handle multiple frames, please check the original example from the async HTTP library.
We are also assuming that the data is being sent in textual format, but take in consideration that websockets also support binary payloads (and this library can also deal with that format).
So, since we have the array with the data and we know its length, we can simply iterate the whole array and print it. Note the conversion of each byte to char, since we assumed we are dealing with textual data.
for(int i=0; i < len; i++) {
   Serial.print((char) data[i]);
}
You can check the complete function below.
void onWsEvent(AsyncWebSocket * server, AsyncWebSocketClient * client, AwsEventType type, void * arg, uint8_t *data, size_t len){

  if(type == WS_EVT_CONNECT){

    Serial.println("Websocket client connection received");

  } else if(type == WS_EVT_DISCONNECT){
    Serial.println("Client disconnected");

  } else if(type == WS_EVT_DATA){

    Serial.println("Data received: ");

    for(int i=0; i < len; i++) {
          Serial.print((char) data[i]);
    }

    Serial.println();
  }
}


The final code

The final Arduino source code can be seen below.
#include "WiFi.h"
#include "ESPAsyncWebServer.h"

const char* ssid = "yourNetworkName";
const char* password =  "yourNetworkPassword";

AsyncWebServer server(80);
AsyncWebSocket ws("/test");

void onWsEvent(AsyncWebSocket * server, AsyncWebSocketClient * client, AwsEventType type, void * arg, uint8_t *data, size_t len){

  if(type == WS_EVT_CONNECT){

    Serial.println("Websocket client connection received");

  } else if(type == WS_EVT_DISCONNECT){
    Serial.println("Client disconnected");

  } else if(type == WS_EVT_DATA){

    Serial.println("Data received: ");

    for(int i=0; i < len; i++) {
          Serial.print((char) data[i]);
    }

    Serial.println();
  }
}

void setup(){
  Serial.begin(115200);

  WiFi.begin(ssid, password);

  while (WiFi.status() != WL_CONNECTED) {
    delay(1000);
    Serial.println("Connecting to WiFi..");
  }

  Serial.println(WiFi.localIP());

  ws.onEvent(onWsEvent);
  server.addHandler(&ws);

  server.begin();
}

void loop(){}


The Python code

As usual, the Python code will be very simple and short. We start by importing the websocket module, which will expose a very simple API for us to create our client. If you haven’t yet installed this module, please consult the previous post for a short explanation on how to do it.
import websocket
Next, we need to create an object of class WebSocket, exposed by the previous module. After that, we will connect to the server.
The websocket endpoint address follows the format below. You will need to change #ESP_IP# by the IP of your ESP32, which will be printed to the serial console once it connects to the WiFi network, and #websocket_endpoint# by “test”, since it was the path we have configured in the Arduino code.
ws://#ESP_IP#/#websocket_endpoint#
You can check below how it looks after changing the placeholders by real values. Note that the IP of your ESP32 will most likely differ from mine.
 
ws = websocket.WebSocket()
ws.connect("ws://192.168.1.78/test")
To send some textual content to the websocket, we simply call the send method on our WebSocket object, passing as input a string with the content.
ws.send("Test")
Finally, we close the connection by calling the close method on the same object. The final Python code an be seen below and already includes this method call.
import websocket

ws = websocket.WebSocket()
ws.connect("ws://192.168.1.78/test")

ws.send("Test")

ws.close()

Testing the code

To test the whole end to end system, the first thing we need to do is compiling and uploading the ESP32 code, using the Arduino IDE.
When the procedure is finished, open the Arduino IDE serial monitor and wait for the device to connect to the WiFi network. If the connection is successful, then it should output an IP, which is the one you need to use on the Python code, as already mentioned.
Note that this tutorial assumes that both the ESP32 and the computer that is running the Python code are connected to the same WiFi network.
After putting the correct IP on the Python code, simply run it. If you go back to the Arduino IDE serial monitor, the connection event should have been detected, then the data sent by the Python client should get printed and finally the websocket closing event should also have been detected, as shown in figure 1.
ESP32 HTTP async websocket server receive data.png
Figure 1 – Textual data received on the websocket endpoint on the ESP32.
DFRobot supply lots of esp32 arduino tutorials and esp32 projects for makers to learn.

ESP32 Tutorial HTTP web server:10. serving image from file system

In this tutorial we will check how to serve an image from the ESP32 file system to a HTTP client. We will use the HTTP async web server libraries in order to setup the server and we will use the ESP32 SPIFFS file system.
From a previous tutorial on how to serve HTML from the file system with the HTTP async web server libraries, please check here.
The tests of this ESP32 tutorial were performed using a DFRobot’s ESP-WROOM-32 device integrated in a ESP32 FireBeetle board.


Uploading the image

Before starting to code and uploading the program to the ESP32, we will need to upload the image to the file system. In order to do so, we will use this Arduino IDE plugin, which allows to upload files to the ESP32 SPIFFS file system from a folder in a computer.
For a detailed tutorial on the procedure, please check this previous post, which contains step by step instructions with images.
As a short summary, after installing the mentioned plugin, we need to create a new Arduino sketch, save it and, on the sketch folder, create a new folder called “data“. In that folder, we should put the image, like shown in figure 1.
ESP32 upload image to SPIFFS.png
Figure 1 – Putting the image in the “data” folder.
Note that we need to be careful regarding the file name and extension, since they will compose the name of the file that will be uploaded to the SPIFFS file system of the ESP32.
For example, I’m using an image that is listed as JPEG, but the actual file has a .jpg extension, and thus we will need to look for a file named “test.jpg” in the ESP32 code.
The easiest way to confirm the correct file name is navigating to the “data” folder using the command line of your operating system and listing the files of that folder. Figure 2 shows this on Windows and, as can be seen, the file is listed with the .jpg extension.
JPEG fle listed in windows file system
Figure 2 – Image listed in Windows file system.
Note that the size of the SPIFFS file system is limited, so you should not upload images too big. Even if the image doesn’t exceed the maximum size allowed for a file, the HTTP web framework may not work well with very large files, although I haven’t yet tested for these scenarios. Nonetheless, I have tested with images around 20 KB and everything worked fine.
For reference, below you can see the image I have used for the test shown in this tutorial.
test.jpg
Figure 3 – Image used in the tests.
To finalize, go back to the Arduino IDE and, on the “tools” menu, click the ESP32 Sketch Data Upload menu item. Wait for the procedure to finish and, after that, the image should be in the file system of the device.
Take in consideration that the file will be created in the root directory of the SPIFFS file system, so its full path will be “/test.jpg“. In order to confirm if it was correctly created in the file system, you can follow this tutorial to fetch the file size, thus confirming that the file was indeed created.


The code

We will start our code by doing all the necessary library includes. In order to connect the ESP32 to a WiFi network, we need the WiFi.hlibrary. To be able to setup the async HTTP web server, we will also need the ESPAsyncWebServer.h library.
Finally, we will need the SPIFFS.h library, since we are going to interact with the file system in order to retrieve the image.
Following the usual procedure when setting up a web server on the ESP32, we need to declare the WiFi credentials so we can connect the device to the network.
We will also need an object of class AsyncWebServer, which we will be using to setup the routes of the server. Remember from previous posts that the constructor for this class will receive as input the number of the port where the server will be listening to incoming HTTP requests.
#include "WiFi.h"
#include "SPIFFS.h"
#include "ESPAsyncWebServer.h"

const char* ssid = "yourNetworkName";
const char* password =  "yourNetworkPassword";

AsyncWebServer server(80);
Moving on to the Arduino setup function, we will start by opening a serial connection to output some content from our program.
Next, we will mount the SPIFFS file system, so we can later access the image we are going to serve to the client. We do this by calling the begin method on the SPIFFS extern variable, which becomes available after importing the SPIFFS.h library.
Remember from the previous post that we can pass a Boolean value indicating if we want the file system to be formatted in case mounting fails. In our case we don’t want this to happen because if we format the file system, then our image will be lost. So, if an error occurs while mounting, then the best approach is to re-upload the file.
Taking this in consideration, we don’t need to pass any value as input of the begin method since the mentioned formatting Boolean value will default to false.
Serial.begin(115200);

if(!SPIFFS.begin()){
    Serial.println("An Error has occurred while mounting SPIFFS");
    return;
}
Moving on, we will connect the ESP32 to the WiFi network and print the local IP assign to the device after the procedure finishes. This IP will be needed by the client that will reach the server.
while (WiFi.status() != WL_CONNECTED) {
    delay(1000);
    Serial.println("Connecting to WiFi..");
}

Serial.println(WiFi.localIP());
Now we will take care of setting up the route that will be serving the image. As we have been doing in all the previous tutorials, we do this by calling the on method on the AsyncWebServer object.
As first input of the method, we will pass a string with the route, which will be “/img” for this example. You can use other route if you want, as long as you use that one when accessing the server.
As second parameter we will specify the HTTP methods allowed. We will only listen to HTTP GET requests in this route.
Finally, as third parameter, we will specify the route handling function, which will be executed when a request is made.
Our handling function will correspond to sending the image back to the client as answer to the HTTP GET request. To do it, we simply need to call the send method on the AsyncWebServerRequest object pointer that is passed by the HTTP web server framework to our handling function.
Note that the send method is overloaded and it has many formats that we can use. In our case, we will use the format that receives as input an object of class FS (from File System), as second a path to a file in the file system, and as third the content-type of the response.
The SPIFFS extern variable that we use to interact with the file system is of class SPIFFSFS, which inherits from the FS class, which means we can use it as first input of the send method.
As second input we will pass string “/test.jpg”, which is the path of the image we uploaded to the file system. Finally, we will set the content-type to “image/jpeg”, so the browser knows how to correctly interpret the content we are going to return.
server.on("/img", HTTP_GET, [](AsyncWebServerRequest *request){
  request->send(SPIFFS, "/test.jpg", "image/jpeg");
});
The final source code can be seen below. It already includes a call to the begin method on our AsyncWebServer object, so it starts listening to incoming requests. Note also that we left the main loop empty since the server works asynchronously, which means we don’t need to periodically poll it for clients.
#include "WiFi.h"
#include "SPIFFS.h"
#include "ESPAsyncWebServer.h"

const char* ssid = "yourNetworkName";
const char* password =  "yourNetworkPassword";

AsyncWebServer server(80);

void setup(){
  Serial.begin(115200);

  if(!SPIFFS.begin()){
        Serial.println("An Error has occurred while mounting SPIFFS");
        return;
  }

  WiFi.begin(ssid, password);

  while (WiFi.status() != WL_CONNECTED) {
    delay(1000);
    Serial.println("Connecting to WiFi..");
  }

  Serial.println(WiFi.localIP());

  server.on("/img", HTTP_GET, [](AsyncWebServerRequest *request){
    request->send(SPIFFS, "/test.jpg", "image/jpeg");
  });

  server.begin();
}

void loop(){}


Testing the code

To test the code, simply compile it and upload it to your ESP32 device using the Arduino IDE. Once the procedure finishes, open the Arduino IDE serial monitor and wait for the the local IP assigned to the ESP32 to be printed, which will happen then the device connects to the WiFi network successfully. Copy that IP address.
Next, open a web browser of your choice and access the following URL, changing #yourIP# by the IP you have just copied:
http://#yourIP#/img
The image previously uploaded to the file system should be returned to the browser, like shown in figure 4.
ESP32 Arduino web server image from file system.png
Figure 4 – Image from the ESP32 file system returned to the client.

DFRobot supply lots of esp32 arduino tutorials and esp32 projects for makers to learn.

2018年12月15日星期六

ESP32 Tutorial web server:9. Serving HTML from file system

In this tutorial we will check how to serve a HTML file from the ESP32 file system, using the Arduino core and the async HTTP web server libraries.
This way, instead of having to declare a big string with all the HTML code in our program, we can organize the content to serve on files in the file system, leading to a much cleaner and scalable implementation.
We will be using the ESP32 SPIFFS file system. You can check here a tutorial on how to get started with it.
The tests of this ESP32 tutorial were performed using a DFRobot’s ESP-WROOM-32 device integrated in a ESP32 FireBeetle board.

Uploading the HTML file

The first thing we need to do is placing the HTML file in the ESP32 file system. Writing it manually using Arduino code is not practical, so we will use this Arduino IDE plugin to upload the file from a folder in a computer to the ESP32 SPIFFS file system. For a detailed tutorial on how to use the plugin, please check this previous post.
To sum up, in order to upload the file using the mentioned tool, we need to create a new Arduino sketch, save it and open the corresponding folder. There, we need to create a folder called “data“, as illustrated below in figure 1. Note that the name of the sketch doesn’t matter, as long as this folder is correctly created in the sketch folder, with the “data” name.
ESP32 Arduino sketch folder data
Figure 1 – Creating the “data” folder for the Arduino IDE plugin.
Inside that folder, we will create a .html file named test_file. This is also an arbitrary name, and it will the same name of the file created in the SPIFFS file system of the ESP32.
Note that the file will be created in the root folder of the ESP32 file sytem (“/”) and it will be named test_file.html. So, when opening the file in the Arduino code, the full path will be “/test_file.html“.
You can check below at figure 2 the file created on the “data” folder.
HTML file to upload to ESP32 SPIFFS file system.png
Figure 2 – HTML file to be uploaded to the ESP32 file system.
Then, open the file, add some HTML content to it and save it. You can check below the HTML content I’ve added to mine, but you can test with other content. Naturally, you need to take in consideration the maximum size of the file system, in order to not exceed it.
<p>Hello from file system</p>
After that and assuming that you have already installed the plugin, go to the “tools” menu of the Arduino IDE, click the ESP32 Sketch Data Upload menu item and wait for the procedure to finish. Once it completes, the file should be in the ESP32 SPIFFS file system.
You can confirm that by following this tutorial and getting the file size, indicating that the file is indeed created.

The code

We will start our code by doing the library includes. As usual, we need the WiFi.h and the ESPAsyncWebServer.h libraries, so we can connect the ESP32 to a WiFi network and then setup the HTTP server, so it can be reached by clients connected to that same network.
Since now we will be working with a file from the file system, we need to include the SPIFFS.h library. This include will make available a extern variable called SPIFFS that we can use to mount the file system and open files.
Additionally, we need to store the credentials of the WiFi network, to later connect to it, on the Arduino setup. We will need the SSID(network name) and password, which we will store in two constant global variables.
We will also need an object of class AsyncWebServer, which will be used to setup the server routes. The constructor of this class receives as input the port where the server will be listening for requests. The port is passed as an integer and we will use port 80, which is the default HTTP port.
#include "WiFi.h"
#include "SPIFFS.h"
#include "ESPAsyncWebServer.h"

const char* ssid = "yourNetworkName";
const char* password =  "yourNetworkPassword";

AsyncWebServer server(80);
Moving to the Arduino setup function, we will first open a serial connection. This connection will be used to output the IP assigned to the ESP32 after connecting to the WiFi network. The client will need this IP to reach the server.
Serial.begin(115200);
After that, we will mount the SPIFFS file system, using the begin method on the SPIFFS extern variable. In case something fails, we will print an error message indicating that it was not possible to mount the file system.
In case some problem occurs, you should try to re-upload the file to the file system using the procedure mentioned in the previous section.
if(!SPIFFS.begin()){
    Serial.println("An Error has occurred while mounting SPIFFS");
    return;
}
Next we will connect the ESP32 to the WiFi network, using the credentials previously declared as global variables.
WiFi.begin(ssid, password);

while (WiFi.status() != WL_CONNECTED) {
    delay(1000);
    Serial.println("Connecting to WiFi..");
}

Serial.println(WiFi.localIP());
After that, we need to setup the HTTP web server. We will create a single route that will return the HTML file we have previously uploaded to the ESP32 file system. The route will be “/html” and will only listen to HTTP GET requests.
In the route handling function implementation, we will return back to the client the HTML file that is stored on the file system. Fortunately, the web server framework handles all the work for us and we simply need to call the send method on the request object pointer that is passed to the route handling function, pretty much like we have been doing in previous tutorials.
In this case, we will use the overloaded version of the send method that receives as first input an object of class FS (from File System), as second the path to the file in that file system, and as third the content-type of the response.
In our case, we are using the SPIFFS file system, which is accessible, as already mentioned, using the SPIFFS extern variable. This is a variable of class SPIFFSFS which inherits from the FS class. This means that we can use it as first argument of the send method.
Naturally, as second argument, we need to pass the path to the file we want to serve, on the file system. As explained in the previous section, it will be “/test_file.html“, since the file was created in the root of the ESP32 file system, with the same name and extension that it had on the computer from which it was uploaded.
The content-type to use is “text/html“, so the client (in our case, it will be a web browser), will know how to interpret the returned content.
server.on("/html", HTTP_GET, [](AsyncWebServerRequest *request){
    request->send(SPIFFS, "/test_file.html", "text/html");
});
To finalize, we simply need to call the begin method on our server object, so it starts listening to incoming HTTP requests.
server.begin();
The final code can be seen below.
#include "WiFi.h"
#include "SPIFFS.h"
#include "ESPAsyncWebServer.h"

const char* ssid = "yourNetworkName";
const char* password =  "yourNetworkPassword";

AsyncWebServer server(80);

void setup(){
  Serial.begin(115200);

  if(!SPIFFS.begin()){
        Serial.println("An Error has occurred while mounting SPIFFS");
        return;
  }

  WiFi.begin(ssid, password);

  while (WiFi.status() != WL_CONNECTED) {
    delay(1000);
    Serial.println("Connecting to WiFi..");
  }

  Serial.println(WiFi.localIP());

  server.on("/html", HTTP_GET, [](AsyncWebServerRequest *request){
    request->send(SPIFFS, "/test_file.html", "text/html");
  });

  server.begin();
}

void loop(){}

Testing the code

To test the code, simply compile it and upload it to the ESP32 using the Arduino IDE, with the Arduino core installed. Once the procedure finishes, open the IDE serial monitor and wait for the ESP32 to connect to the WiFi network. When it does, the local IP assigned to it should get printed. Copy it.
Next, open a web browser of your choice and paste the following in the address bar, changing #yourIP# by the IP you have just copied:
http://#yourIP#/html
You should get an output similar to figure 2, which shows the HTML content being returned and rendered, as expected.
ESP32 serve HTML from file system
Figure 1 – Serving the HTML content from the ESP32 file system.
DFRobot supply lots of esp32 arduino tutorials and esp32 projects for makers to learn.