2018年11月28日星期三

ESP32 Arduino Tutorial HTTP Server:2. Template processing with multiple placeholders

In this tutorial we will check how to use multiple placeholders in the template processing engine of the HTTP async libraries for the Arduino core, running on the ESP32.

If you need an introduction on how the template processing works, please check this previous post.

The code fr this tutorial will be very simple and similar to what we have been covering before, with the exception that now we will handle more that one placeholder in the template processor function.

We will simulate a scenario where we would want to return a HTML web page with a temperature and humidity value that would only be known at runtime. For this test and to focus on the template processing features, we will generate some random values to simulate temperature and humidity measurements. You can check more about random number generation on the ESP32 in this previous post.

The tests were performed using a DFRobot’s ESP32 module integrated in a ESP32 development board.

If you prefer a video version of this tutorial, please check here:

The setup code

We start by including the libraries needed to connect the ESP32 to a WiFi network and to setup the HTTP server. Additionally, we will need the WiFi credentials of the network, so we can connect the ESP32 to it.
#include "WiFi.h"
#include "ESPAsyncWebServer.h"

const char* ssid = "yourNetworkName";
const char* password =  "yourNetworkPassword";
Next we will declare the string that will contain the HTML code with the placeholders. We will define a placeholder to be replaced with the simulated temperature value, and another for the humidity. Remember from the previous post that placeholders are enclosed in percentage signs “%”.

Note that we are declaring this HTML string as constant so it is placed in FLASH memory rather than in RAM. For bigger web pages, this allows to save a lot of RAM

const char * html = "<p>Temperature: %PLACEHOLDER_TEMPERATURE% ºC</p><p>Humidity: %PLACEHOLDER_HUMIDITY% %</p>";

To finalize the global variables declaration, we will need an object of class AsyncWebServer, which will be used to configure the endpoints of the server. The constructor of this class receives as parameter the port where the server will be listening. We are going to use the default HTTP port, which is 80.

AsyncWebServer server(80);

Moving to the Setup function, we will start by opening a serial connection. This will be useful to output the IP assigned to the ESP32 once it connects to the WiFi network, so we can then reach the server it will be hosting. We will also connect the ESP32 to the WiFi network.

Serial.begin(115200);

WiFi.begin(ssid, password);

while (WiFi.status() != WL_CONNECTED) {
    delay(1000);
    Serial.println("Connecting to WiFi..");
}

Serial.println(WiFi.localIP());

Still in the Arduino Setup, we will now configure an endpoint where our server will be listening. It will be called “/sensor” and listen only to HTTP GET requests, since the client will only be requesting for the HTML page
server.on("/sensor", HTTP_GET, [](AsyncWebServerRequest *request){
    // Route handling function
});
n the handling function, we will return the answer to the client using the send_P method of the request object that is passed to the handling function by the HTTP web server framework.

As first input of the send_P method we specify the HTTP status code, which will be 200 (success). The second argument corresponds to the content-type, and it will be “text/html”.

The third argument will be the HTML string which we defined as global variable and the fourth will be the template processor function. We will define this function below, but recall that it needs to follow this signature.

server.on("/sensor", HTTP_GET, [](AsyncWebServerRequest *request){
    request->send_P(200, "text/html", html, processor);
});
To finalize the Setup function, we need to call the begin method on our server object, so it starts listening to incoming HTTP requests.
server.begin();
The full setup function can be seen below.
void setup(){
  Serial.begin(115200);

  WiFi.begin(ssid, password);

  while (WiFi.status() != WL_CONNECTED) {
    delay(1000);
    Serial.println("Connecting to WiFi..");
  }

  Serial.println(WiFi.localIP());

  server.on("/sensor", HTTP_GET, [](AsyncWebServerRequest *request){
    request->send_P(200, "text/html", html, processor);
  });

  server.begin();
}

The template processor

As stated before, the template processor function needs to follow a pre-defined signature. It will receive the placeholder value as input (without the percentage signs enclosing it) and it should return a string, which corresponds to the value to be used instead of the placeholder.

Note that since we can only pass a processor function to the send_P method, it means that this function will be used for all the placeholders found. So, it will be called as many times as placeholders are found in the HTML string.

So, to confirm this is the actual behavior, the first thing we will do is printing the value received by the processor function.
Serial.println(var);

Since this function will be reused for the two placeholders, we need to implement here the conditional logic to decide which value to return for each placeholder. We can do it with some simple if else statements.

In both cases, since we are simulating measurements determined at runtime, we will return some random values.
if(var == "PLACEHOLDER_TEMPERATURE"){
    return String(random(10, 20));
}

else if(var == "PLACEHOLDER_HUMIDITY"){
    return String(random(0, 50));
}
To finalize, as a safeguard, we should return an empty string in case some placeholder that doesn’t match any of our conditions is passed to the template processor. Naturally, this should never happen if everything is correctly configured.
return String();
You can check the full function implementation below.
String processor(const String& var)
{

  Serial.println(var);

  if(var == "PLACEHOLDER_TEMPERATURE"){
    return String(random(10, 20));
  }

  else if(var == "PLACEHOLDER_HUMIDITY"){
    return String(random(0, 50));
  }

  return String();
}

The final code

You can see the final code below. Note that the main loop may be left empty since the async web server doesn’t need a periodic call to some function or method to process the clients’ requests.
#include "WiFi.h"
#include "ESPAsyncWebServer.h"

const char* ssid = "yourNetworkName";
const char* password =  "yourNetworkPass";

const char * html = "<p>Temperature: %PLACEHOLDER_TEMPERATURE% ºC</p><p>Humidity: %PLACEHOLDER_HUMIDITY% %</p>";

AsyncWebServer server(80);

String processor(const String& var)
{

  Serial.println(var);

  if(var == "PLACEHOLDER_TEMPERATURE"){
    return String(random(10, 20));
  }

  else if(var == "PLACEHOLDER_HUMIDITY"){
    return String(random(0, 50));
  }

  return String();
}

void setup(){
  Serial.begin(115200);

  WiFi.begin(ssid, password);

  while (WiFi.status() != WL_CONNECTED) {
    delay(1000);
    Serial.println("Connecting to WiFi..");
  }

  Serial.println(WiFi.localIP());

  server.on("/sensor", HTTP_GET, [](AsyncWebServerRequest *request){
    request->send_P(200, "text/html", html, processor);
  });

  server.begin();
}

void loop(){}

Testing the code

To test the code, simply compile it and upload it to your device. Once it finishes, open the Arduino IDE serial monitor and wait for the ESP32 to connect to the WiFi network. When the connection is established, an IP should get printed to the console. Copy it, since it will be needed to reach the server.

Now, open a web browser of your choice and type the following in the address bar, changing #yourIP# by the IP you have just copied:
http://#yourIP#/sensor
You should get an output similar to figure 1, which shows that in the final HTML returned to the client the placeholders were replaced by the simulated measurements.
Figure 1 – Final HTML with the placeholders replaced by simulated measurements.
If you go back to the Arduino IDE serial monitor you should see the two placeholder values getting printed, as shown in figure 2. Recall that, as mentioned, the percentage signs are not passed to this function.
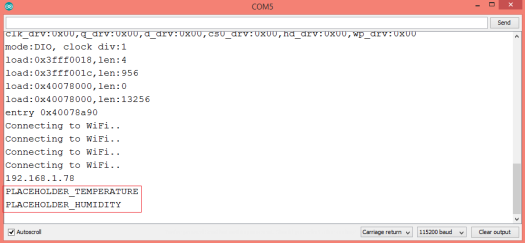
Figure 2 – Template processing placeholders.

ESP32 Arduino Tutorial HTTP server:1. Template processing

In this tutorial we will check how to use the template processing features of the async HTTP webserver libraries for the ESP32. You can follow this previous tutorial to check how to configure the HTTP async web server libraries for the Arduino core, running on the ESP32.

In some use cases, we may want to return to the client, for example, a HTML page that contains values that are only known at run time. One such example could be retrieving a page that shows the current temperature and humidity in a room.

One quick way to solve the problem could be declaring the HTML pieces that compose the final HTML page and then concatenate the strings with the temperature and humidity obtained at runtime.

Nonetheless, the code would be harder to understand and maintain, and if we wanted to add more sensor variables it would start to become unpractical.

So, a tool that many web server frameworks offer to tackle this problem is a template engine that allows to specify the base HTML and then placeholders for text replacement, conditional evaluation and looping expressions, amongst many other features.

These allow to combine the base template with the run time data to produce the final HTML document, making programming much easier and maintainable.

The HTTP ESP32 async web server offers a very simple template processing engine that allows to replace placeholders with values determined at runtime. These placeholders are included in the HTML code between percentage signs “%”.

The tests were performed using a DFRobot’s ESP32 module integrated in a ESP32 development board.

If you prefer a video version of this tutorial, please check my YouTube channel below:

The setup code

As usual, we start by including the libraries needed. We will need the WiFi.h library, so the ESP32 can connect to a Wireless network, and the ESPAsyncWebServer.h, so we can setup the async HTTP web server.
#include "WiFi.h"
#include "ESPAsyncWebServer.h"
Naturally, we will also need the credentials of the WiFi network, which we will store in two global variables.
const char* ssid = "yourNetworkName;
const char* password = "yourNetworkPassword";
We will also declare our HTML code as a string. We will make it constant so it is stored in FLASH memory [1]. Remember that we should specify our placeholder between percentage signs “%“.


Our HTML code will be really simple and it will basically consist on a paragraph. The content of the paragraph is what will be replaced at runtime.
const char * html = "<p>%PLACEHOLDER%</p>";
Finally, we need an object of class AsyncWebServer, which is used to configure the routes of the server. Remember from previous posts that the constructor for this class receives the number of the port where the server will be listening. We will use port 80 since it is the default HTTP port.
AsyncWebServer server(80);
Next, we will move on to the setup function. As usual, we first take care of opening a serial port to output the results of our program, and also to connect the ESP32 to a WiFi network, using the previously declared credentials.

Note that we will print the local IP assigned to the ESP32 once the connection is established, so we know which IP address to use when making the request to the server.
erial.begin(115200);

WiFi.begin(ssid, password);

while (WiFi.status() != WL_CONNECTED) {
    delay(1000);
    Serial.println("Connecting to WiFi..");
}

Serial.println(WiFi.localIP());
Now we will configure the routes where our server will be listening. For this particular example, we will only need a single route. We will call it “/hello” and it will only listen to HTTP GET requests.
server.on("/hello", HTTP_GET, [](AsyncWebServerRequest *request){
// Route handling function
});
In our handling function, we will return the answer to the client using the send_P method of the request object. As explained in the library documentation, this function is used to send large pages from PROGMEM.

Note: Although it is not clear in the documentation if this send_P method was designed to work with constant data stored in FLASH memory on the ESP32, it seems to be the only option that allows to specify the return status code, the content-type, the content and the template processor. You can check the list of variants of the send method here. For the use cases I’ve tested, it seems to be working fine.

So as first input of the send_P method we pass the status code to return, as second the content-type, as third the actual content and as fourth and final, the template processor function.

We will return a OK status code (200), the content-type will be “text/html” and the content will be the const string we previously declared. As template processor we will use a function called processor which we will define below.
server.on("/hello", HTTP_GET, [](AsyncWebServerRequest *request){
  request->send_P(200, "text/html", html, processor);
});
To finalize the setup, we need to call the begin method on our AsyncWebServer object, so the server begins listening to incoming HTTP requests.
server.begin();

The processor function

Now we will define the template processing function, which needs to follow the signature defined here. This template processing function is a user defined function that will receive the template value and should specify which value to be used instead of the template.
String processor(const String& var) {
// processor implementation
}
Note that the template value is passed to the function without the percentage signs enclosing it. In our case, since we defined %PLACEHOLDER% as our placeholder in the HTML string, then this processor function will receive as input the value PLACEHOLDER.

We will first print the received value to the serial port, to confirm that it matches what we are expecting, and then we will define what to return to be used in place of the placeholder.
Serial.println(var);
Then, we check if the received value matches the placeholder we are expecting, and in case it is, we return the string to be used instead of it.
if(var == "PLACEHOLDER")return "Hello world from placeholder!";
The full placeholder function is shown below. Note that we return an empty string in case our condition is not met, just as a safeguard. Nonetheless, this may be more useful in more complex scenarios with multiple placeholders.
String processor(const String& var)
{

  Serial.println(var);

  if(var == "PLACEHOLDER")return "Hello world from placeholder!";

  return String();
}

The final code

The final source code can be seen below. Note that the Arduino main loop can be left empty since the asynchronous HTTP web server doesn’t require any periodic call of a function to handle the clients, like other older frameworks do.
#include "WiFi.h"
#include "ESPAsyncWebServer.h"

const char* ssid = "yourNetworkName";
const char* password =  "yourNetworkPassword";

const char * html = "<p>%PLACEHOLDER%</p>";

AsyncWebServer server(80);

String processor(const String& var)
{

  Serial.println(var);

  if(var == "PLACEHOLDER")
    return "Hello world from placeholder!";

  return String();
}

void setup(){
  Serial.begin(115200);

  WiFi.begin(ssid, password);

  while (WiFi.status() != WL_CONNECTED) {
    delay(1000);
    Serial.println("Connecting to WiFi..");
  }

  Serial.println(WiFi.localIP());

  server.on("/hello", HTTP_GET, [](AsyncWebServerRequest *request){
    request->send_P(200, "text/html", html, processor);
  });

  server.begin();
}

void loop(){}

Testing the code

To test the code, simply compile it and upload it to your device. When the procedure finishes, open the Arduino IDE serial monitor. As soon as the ESP32 finishes the connection to the WiFi network, an IP address should get printed to the serial port. Copy that IP, since we will need it to reach the server.

Then, open a web browser of your choice and type the following in the address bar, changing #yourIP# by the IP you have just copied from the serial monitor.
http://#yourIP#/hello
You should get the result shown in figure 1. As can be seen, the placeholder was substituted by the string we have defined in the processor function.
Figure 1 – Resulting HTML, after the template substitution.

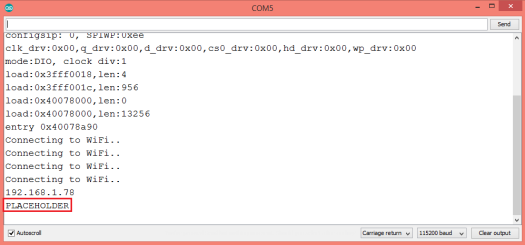
If you go back to the Arduino IDE serial monitor, the value received by the template processor function should be printed, as shown in figure 2.

Figure 2 – Value received by the placeholder processing function.

2018年11月2日星期五

One hit to a colorworld, a colorful grapefruit made use of micro:bit

As a trickster for Halloween, how can we lack an ingenious pumpkin lantern as an equipment?
This time we want to use Micro:bit to make a maker grapefruit lamp that can change color through one hit.

Prepare materials
Big grapefruit x1
Needle, utility knife, chopsticks or small wooden stick, scrap wire or wire, wool


1. Open grapefruit on the top and remove the pulp inside.
2. Draw and cut the shape of the monster's eyes and mouth. Then Use a fruit knife to engrave them. Clean it after the grave work is done.
3. Open https://makecode.microbit.org/ 
The first step is to add a light strip function first. The flow of calling instructions is: Advanced ---- add software package --- neopixel. Click neopixel to add the neopixel module.
All programming graphics are distinguished by color. For example, the red module “Set LED to 0” in the figure below is red. You can find the red variable option in the function column on the left. This option will pop up all programming graphics inside this function, select the one that you need.

There are 10 kinds of color of this light strip. You can choose the color according to your preference.

5. After the program is written, connect the micro:bit and the computer with a USB cable, then name it and download it to the micro:bit board.


6. Link the light strip to port P0, attach the battery, place it in the grapefruit shell, and fix it with tape.


Fix the upper line on the top of the grapefruit skin and tie the thread to the small wooden stick or chopsticks, and stitch the two parts of the grapefruit skin together with wool or fine wire. An interesting maker grapefruit lamp is ready!

2018年11月1日星期四

Electron Music Box Buzzer

Hardware components
Arduino UNO
Buzzer
Jumper wires (generic)

Software apps and online services
Github ElectronJS

Story
Hello everybody! I wanted to share my latest creation on Hackster, which is a an app using ElectronJS to play songs on a buzzer using an Arduino! This project was a bit challenging as this is my first attempt at making an Electron app.

ElectronJS is software that allows you to make native apps using JavaScript — which makes it super easy to build a desktop app to work with our Arduino!

Idea Background
This idea came to me as I wanted to make something using a buzzer, as I didn't experiment with buzzers often, so I decided to make something. Then it hit me — why not make an application to play music on it?

I also noticed there is a library of songs that can play songs on a buzzer using Johnny-Five, so why not make an app to control a selection of songs over the Arduino? In fact, why not an Electron app??

And that's when I started making my idea!

Wait wait wait...Electron?
Some people may not be aware as to what ElectronJS is. To put it simply, it's software that enables you to make Native applications using the Blink engine, which is the same engine Google Chrome uses! This allows us to make applications that use HTML, CSS, and JavaScript, and allow it to work with Node.js to work with entire file systems if we want to.

For this project, we're simply making an app that communicates down to our server, which is at the same level as our Arduino.

Setting Up The Application
For this project, it's very simple and very bare. The main objectives of the project were to make a working menu bar app, that communicates via websockets to start and stop the songs playing on the buzzer. Also, the app has to know when a song has finished playing to update the interface so the user knows the song is finished.

Making a menubar application is a big step for someone that's new to ElectronJS, as opposed to making a simple Chrome-based application using a typical window. This in itself was quite challenging, but it's not impossible.

Application Structure
For this project, I set out to fragment the application to work as an app that works with websockets, in order for the commands to be sent down to the server, which was on the same level as the robot's programming.
project 
 ├─-app 
 |   └--index.js 
--config.js 
--index.html 
--main.js  
--robot.js 
In this case, main.js is where all of our Electron's application scripts go. It calls on an index.html file to use as the front end, with app/index.js being the front end's scripting. The robot.js file is used for the Arduino and also the server.

There is also a config file, which is used to store the hostname and port for these files.

Making the Electron Tray
Since this project is merely a menubar app, this is needing some configuration to not only show the window, but also make what is known as a 'tray'.
// Set up Tray and Window variables 
let win; 
let tray; 

// Once the app is ready, make the menu tray and create a new window. 
app.on('ready', () => { 
 makeTray(); 
 makeWindow(); 
}); 

// Store the app's tray icon in a variable — required to make the tray. 
const appIcon = path.join(__dirname, 'static/images/tray-icon.png'); 
const appIconHighlighted = path.join(__dirname, 'static/images/tray-icon-highlight.png'); 

// Build the Tray in our Menubar 
const makeTray = () => { 
 tray = new Tray(appIcon); 
 tray.setToolTip(config.appName); 
 // Toggle the app's window when the tray's icon is clicked 
 tray.on('click', function(event) { 
   toggleWindow(); 
   if (win.isVisible() && process.defaultApp && event.metaKey) { 
     win.openDevTools({ mode: 'detach' }) 
   } 
 }); 
 if (process.platform == 'darwin') { 
   tray.setPressedImage(appIconHighlighted); 
 } 
} 

// Build the App's Window 
const makeWindow = () => { 
 win = new BrowserWindow({ 
   width: 300, 
   height: 570, 
   show: false, 
   frame: false, 
   resizable: false, 
   fullscreen: false, 
   transparent: true, 
   title: config.appName 
 }); 

 // Load the project's HTML file into the app window 
 win.loadURL(`file://${path.join(__dirname, 'index.html')}`); 
 // When the user goes to another app, hide our app 
 win.on('blur', () => { 
   if(!win.webContents.isDevToolsOpened) { 
     win.hide(); 
   } 
 }); 
} 

// Toggle function for the app window 
const toggleWindow = () => { 
 if (win.isVisible()) { 
   win.hide() 
 } else { 
   showWindow(); 
 } 
}
 
// Set positioning for window when it shown (mostly for Mac OS) 
const showWindow = () => { 
 const trayPos = tray.getBounds(); 
 const winPos = win.getBounds(); 
 // set x and y co-ordinate variables to 0 
 let x, y = 0; 
 if (process.platform === 'darwin') { 
   x = Math.round(trayPos.x + (trayPos.width / 2) - (winPos.width / 2)); 
   y = Math.round(trayPos.y + trayPos.height); 
 } 
 win.setPosition(x, y, false); 
 win.show(); 
 win.focus(); 
} 

Using the code above in main.js, the Electron app will make a menubar tray, which, when toggled, will show or hide our application. On MacOS/OS X, this will place our application window directly beneath the centre of our app's tray icon!

One other thing required for the menu tray to work is to show it during an event fired from the ipcRenderer, from our application front end, so under our scripts for app/main.js we send the 'show-window' event once the application's DOM (Document Object Model) has been loaded.
// app/index.js
const { ipcRenderer } = require('electron'); 
document.addEventListener('DOMContentLoaded', () => { 
 // Fire the `show-window` event for the ipc in Electron 
 ipcRenderer.send('show-window'); 
}); 
// main.js
// When the app's file sends the 'show-window' event, run showWindow() 
ipcMain.on('show-window', () => { 
 showWindow(); 
}); 

And now we've got the application running as a menubar application!

Making Our Arduino's Server
In `robot.js`, a server can be made that's exclusively for taking data sent from the application's front end, and vice versa. The idea is to build a server that runs under a specific port, with Websockets running on the server.
const { Board, Piezo, Led } = require('johnny-five'); 
const express = require('express'); 
const { Server } = require('http'); 
const socketIO = require('socket.io'); 
const songs = require('j5-songs'); 

// Import project config 
const config = require('./config'); 

// Set up the socket server 
const app = express(); 
const http = Server(app); 
const io = socketIO.listen(http); 

// Make a new johnny-five Board() instance 
const board = new Board(); 

// Begin the server under the specified port 
http.listen(config.port, () => { 
 console.log(`Server Running under *:${config.port}. Remember to run 'yarn start' to run the app.`); 
}); 

board.on('ready', function() { 
 console.log('board ready'); 

 // Store the Piezo in a constant 
 const buzzer = new Piezo(3); 

 // If the board is connected and is connected to the client, give a handshake. 
 io.on('connect', (client) => { 
   client.on('join', handshake => { 

     io.emit('robot-connected', 'Robot Connected'); 

     // Write the handshake in the terminal console 
     console.log(handshake); 
   });

    // When the app selects a song to play, stop the buzzer playing the current song, then play the selected song.  
   client.on('play-song', (song) => { 
     buzzer.stop(); 
     buzzer.play(songs.load(song), (songEnded) => { 
       if(songEnded) { 
         io.emit('song-ended'); 
       } 
     }); 
   }); 
   
    // If the app selects a song that's already playing, stop the buzzer.  
   client.on('stop-song', () => { 
     buzzer.stop(); 
   }); 
 }); 
}); 
Once the Arduino board is connected, it will wait for the front end to connect and, when successful, will let the front end know the app is connected to the Arduino. It's necessary for the Arduino board to be running alongside the server in order to run the app.
Using Johnny Five and Julian Duque's j5-songs library, sockets can be set up to wait for the front end to press a button, and receive the button's value to play a song on the buzzer. In addition, the server will let the front end know when the song is finished.
// app/index.js
const socketIOClient = require('socket.io-client'); 
// Fetch Config file 
const config = require('../config'); 
// Set up connection to Server Sockets 
const io = socketIOClient(`http://${config.hostName}:${config.port}`);
Another thing to add in the application's front end scripts is to set up the Websockets client, and where the sockets should connect to!
Building The Front End and Making It Communicate
Now that the app and server is running, a front end has to be built using HTML, CSS, and JavaScript. The main part of our HTML is an unordered list that contains a set number of songs for buzzer.
<!-- Playlist application controls --> 
<ul class="playlist app-controls" id="playlist"> 

 <li class="playlist__item"> 
   <div class="playlist__item__label"> 
     <span>Super Mario</span> 
   </div> 

   <div class="playlist__item__button"> 
     <button class="c-button" data-song="mario-fanfare">Play</button> 
   </div> 
 </li> 

 <li class="playlist__item"> 
   <div class="playlist__item__label"> 
     <span>Star Wars</span> 
   </div> 

   <div class="playlist__item__button"> 
     <button class="c-button" data-song="starwars-theme">Play</button> 
   </div> 
 </li> 

 <li class="playlist__item"> 
   <div class="playlist__item__label"> 
     <span>Never Gonna Give You Up</span> 
   </div> 

   <div class="playlist__item__button"> 
     <button class="c-button" data-song="never-gonna-give-you-up">Play</button> 
   </div> 
 </li> 

 <li class="playlist__item"> 
   <div class="playlist__item__label"> 
     <span>Nyan Cat</span> 
   </div> 

   <div class="playlist__item__button"> 
     <button class="c-button" data-song="nyan-melody">Play</button> 
   </div> 
 </li> 

 <li class="playlist__item"> 
   <div class="playlist__item__label"> 
     <span>Tetris</span> 
   </div> 

   <div class="playlist__item__button"> 
     <button class="c-button" data-song="tetris-theme">Play</button> 
   </div> 
 </li> 
</ul> 
<!-- /Playlist application controls --> 
In the button of each item, there's a data attribute called data-song that contains the Song ID of the list item's song, as specified in the Songs table in the j5-songs repository. The value stored in the data-song attribute will be sent to the server so the buzzer knows which song to play!
 

React and Traffic Lights

A small JavaScript project for controlling and animating a set of LEDs that act like Traffic Lights via a arduino Microcontroller.
Hardware components


Arduino UNO

LED (generic)
Resistor 330 ohm
Jumper wires (generic)

Software apps and online services
Johnny-Five

Diagram
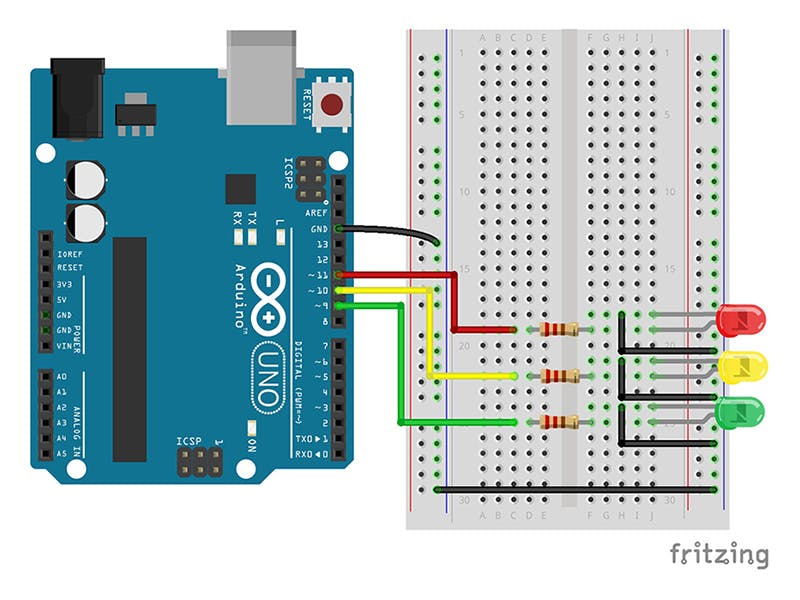
The diagram is pretty simple — connect up each arduino  LED to pins 11, 10, and 9, respectively, along with the 220Ohm resistors for each LED. Remember to attach the Ground so the circuit can work! All in all, the circuit is very simple to put together.

Installing
You can use NPM or Yarn to install and use the application, though I recommend yarn, it's pretty good for dependency management.

You can do npm install or yarn install to download all the app's dependencies.

Commands
There are various commands you can use to work the app, from building, to development, to testing. Again, you can use Yarn or NPM to run the app.

List of Commands

start — Start the app Server (note: run build first!)build — Build the app for a production environmentdev-start — Start the app server under the development environmentdev-server — Runs the Webpack development server for the client-side React appstyles — Build the Application styles (uses PostCSS)test — Runs ESlint and Flow to check the code for issues.